


Bloodwing Build Notes
If you find this build write up useful and end up making your own bloodwing because of it, it would be very nice if you'd link back to either the build itself or the page in general (also share your work with us).
I. Pre-planning
Before you even consider getting materials for a project like this, make sure you do your research! I spent a few weeks collecting reference images (of Bloodwing from both games, tutorials on poseable art dolls, sculpture/anatomical and taxidermy reference, etc). Turns out that the weird taxidermy phase I had in my youth was useful here! I found Magweno's Poseable Art doll tutorial to be the most useful, and I highly recommend checking 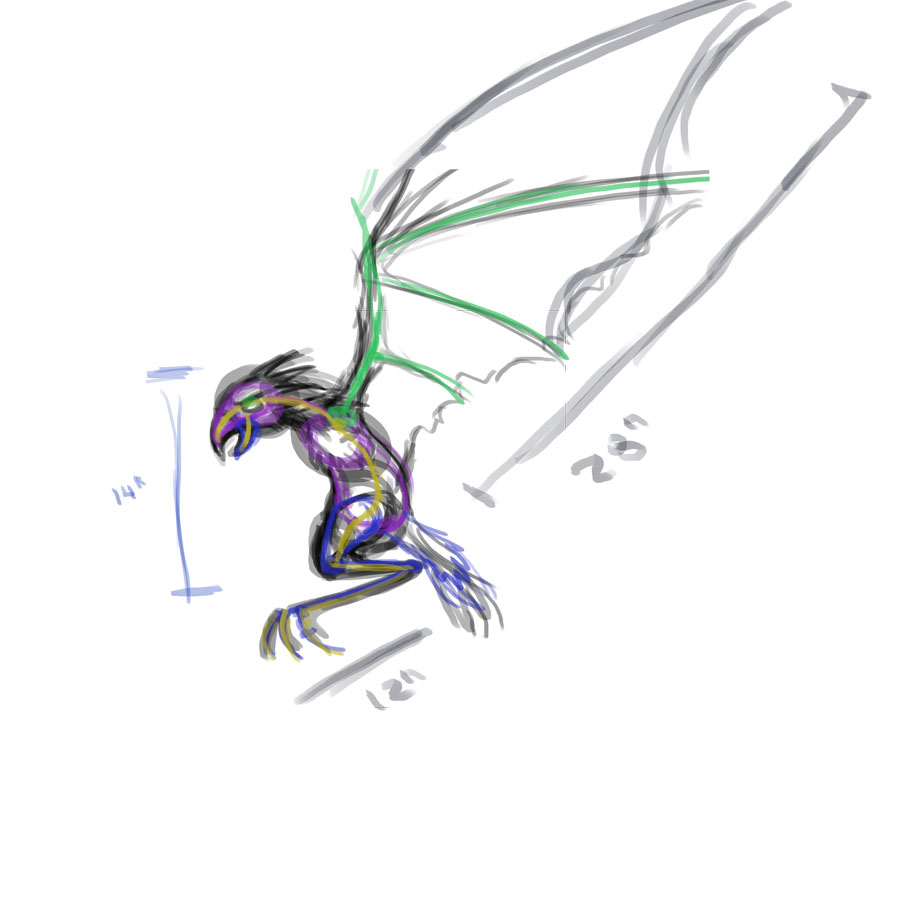 out her site and reading through everything. Deviant Art is also a pretty good resource for this kind of thing - there are a lot of people on there making dolls/props similar to this one and it's always useful to look at other people's solutions to problems before attempting your own. Research! Research! Research!
I also drew out a number of diagrams for how Bloodwing's skeletal structure might work and did some calculations in terms of size (and in comparison to real birds - she's slightly smaller than a turkey vulture at her full height. Though honestly resembles a diving bird like comorant in proportions. YES I THOUGHT TOO LONG ON THIS SUBJECT).
Also it's important to consider what sort of functionality you want out of this kind of prop - I wanted Bloodwing to be able to perch on my arm without help, so that was a structural problem that I had to consider in design. Even though I did some research into having a moveable beak, I decided that ultimately it was more trouble then it was worth.
II. Materials/Tools
The materials list is not exact - I used a lot of materials we just had lying around the house (we have a lot of random materials around at this point).
- Aluminium Armature wire (I used two different gauges of this - a thinner one for reinforcing the armature, and a thicker one for the basis of the armature). You can get it in most art stores, or online. You can also just go to Home Depot if you don't want the fancy stuff.
- Floral tape - You can get this at any store that sells florist supplies (like Michael's). You can also use masking tape in place of the floral tape if you don't feel comfortable with it as there's a little bit of a learning curve (I like it a little better than masking tape mostly because my cat is less inclined to try and eat it).
- Aluminum foil
- high quality faux fur. It's important that it's better quality as it won't shed as much as the cheap stuff. I got BW's fur from the Fabric Empire. It's a little pricey but you don't need much (like 1/4th of a yard. I have so much left over, I could probably make 4 more bloodwings).
- faux suede (I also got this from the fabric empire)
- garment quality lambskin: I spent a lot of time researching a good wing membrane material that would look good on both sides and drape correctly, and unfortunately leather was really the best choice. I used about 1.5 sides worth of white lambskin for the membranes. We get ours from our local Tandy Leather Factory
- Acrylic gesso, paint & varnish
- Airbrush & Airbrush paints
- super sculpey (you'll also need a working oven to fire it in)
- sculpting tools/hands
- red/orange glass decorative floral filler/rocks (they're the little glass rocks you use to fill up vases. unfortuanately they are not sold individually, so you actually have to buy a bag of them)
- leather awl
- sewing needle & thread
- hot glue
- muslin fabric
- butcher paper
III. Create the Armature/Sculpting the Head
 The Armature:
I'm not going to go into detail on creating an armature - there are tons of tutorials on how to do this all over the web, so this is mostly just a summary.
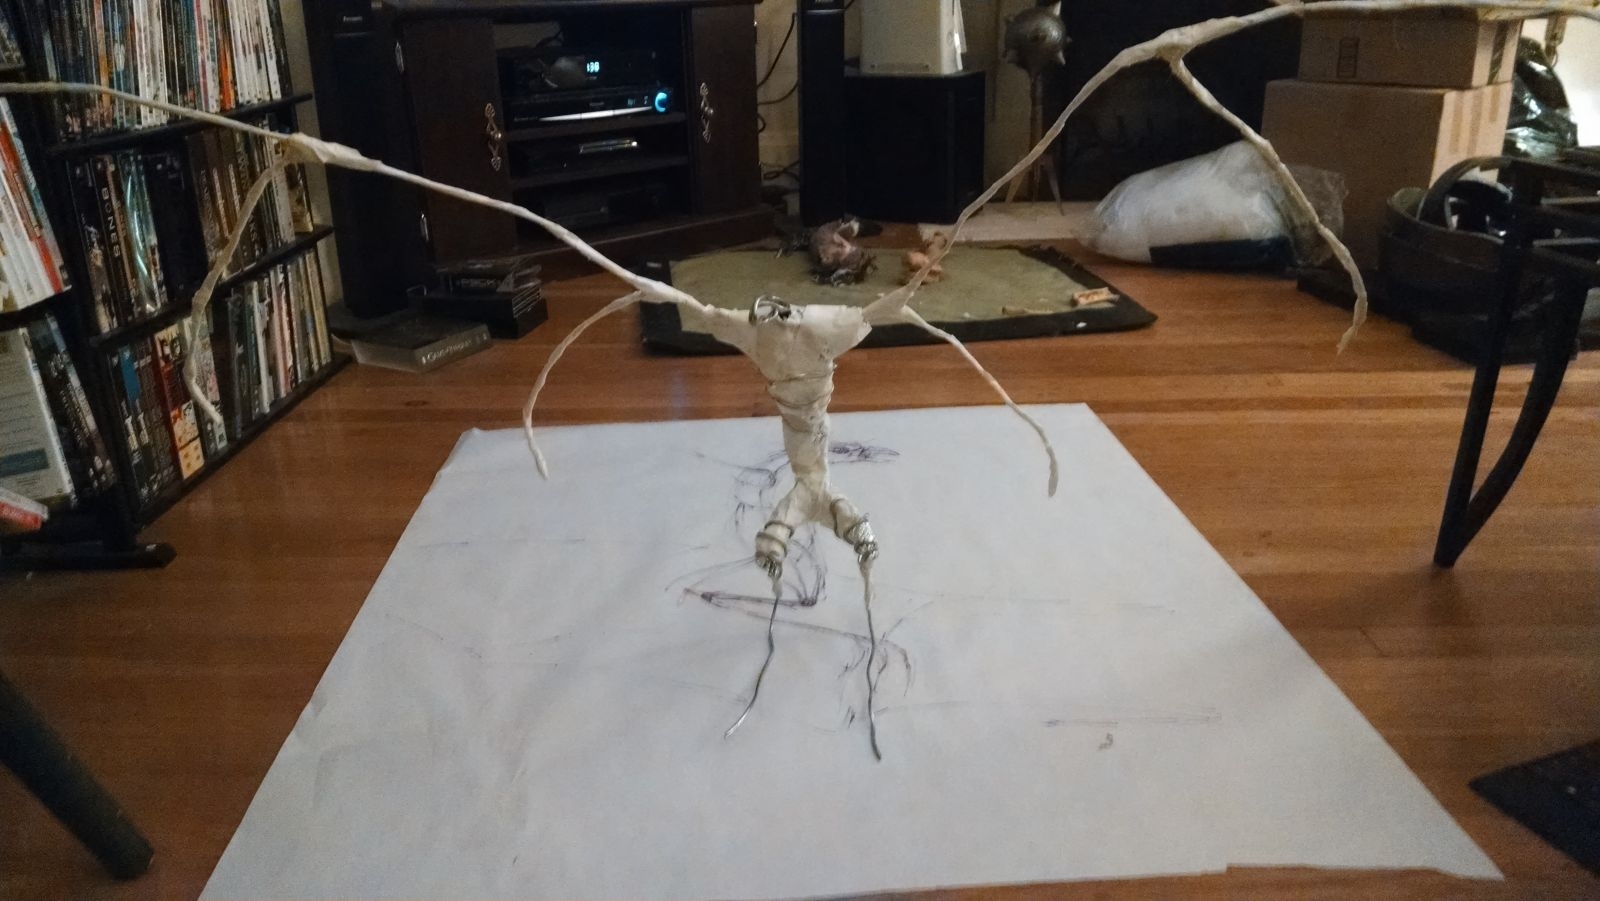
Basically, I drew out Bloodwing's skeletal structure to scale on butcher paper and then followed it in creating the armature. I bulked out the skeleton by bunching aluminum foil around the wire and then covering it in tape. Occasionally I also reinforced it by wrapping the thinner wire around it to make it sturdier. I wanted Bloodwing to be fully poseable, so decided to make almost her whole body wired. I ended up bulking her body up a little more just so that it could better support itself and stand up.
In hindsight, I'd probably make her wings out of either a thicker wire or make it a jointed armature so that the basic form of the wings is a little more rigid but can still fold in on itself. I'd probably also change it to be a bit more like bat wings - even though the original designer of Bloodwing didn't - having the wings not work like hands gives them a few other structural issues (mostly it's just too bendy for my tastes).
The head:
.jpg)
Unfortunately I didn't take any pictures of the head before I started sculpting, but basically the armature for the head was similar to the body. Instead of making it out of wire, I used aluminum foil to create the shape of the head and covered it in floral tape. Then I rolled out the clay and covered the head with it. Once there was enough clay, I imbedded more armature wire out the back of the head so it could be attached to the body after it was fired.
From there it was all sculpting - constantly referring to reference of Bloodwing's head and the heads of various birds (vultures, falcons, eagles, parrots) that have similar beak/head shapes to bloodwing's.
Once I had the basic shape, I inset the glass rocks in as the eyes so I could form the brow around it. You can also make the eyes out of sculpey, but I like the natural reflectiveness of the "rock" (you can also use taxidermy glass eyes, but they're a little expensive and bloodwing has weirdly stylized eyes anyway, so I was just going to paint in the pupil). It also gives you a hard shape to work the clay around.
When I was happy with the design, I fired it in the oven per the directions on the super sculpey package (I had to carefully set it up in the pan so the beak wouldn't get weirdly flattened on the bottom).
Once it was fired and cooled, I attached the head to the body with the embedded wires (wrapped around the neck). I also reinforced this connection with more apoxy sculpt.
In hindsight: If I were to make another of these, I'd probably cast it out of something slightly less fragile (like resin). The sculpey is pretty easy to work with and you can fire it in the oven which are all pros, but I had to repair one of bw's head tentacles with apoxy sculpt when it fell over and snapped. The sculpey also makes the whole thing a little bit top heavy, which requires a little extra bit of balancing.
III. Painting The Head
Once the head w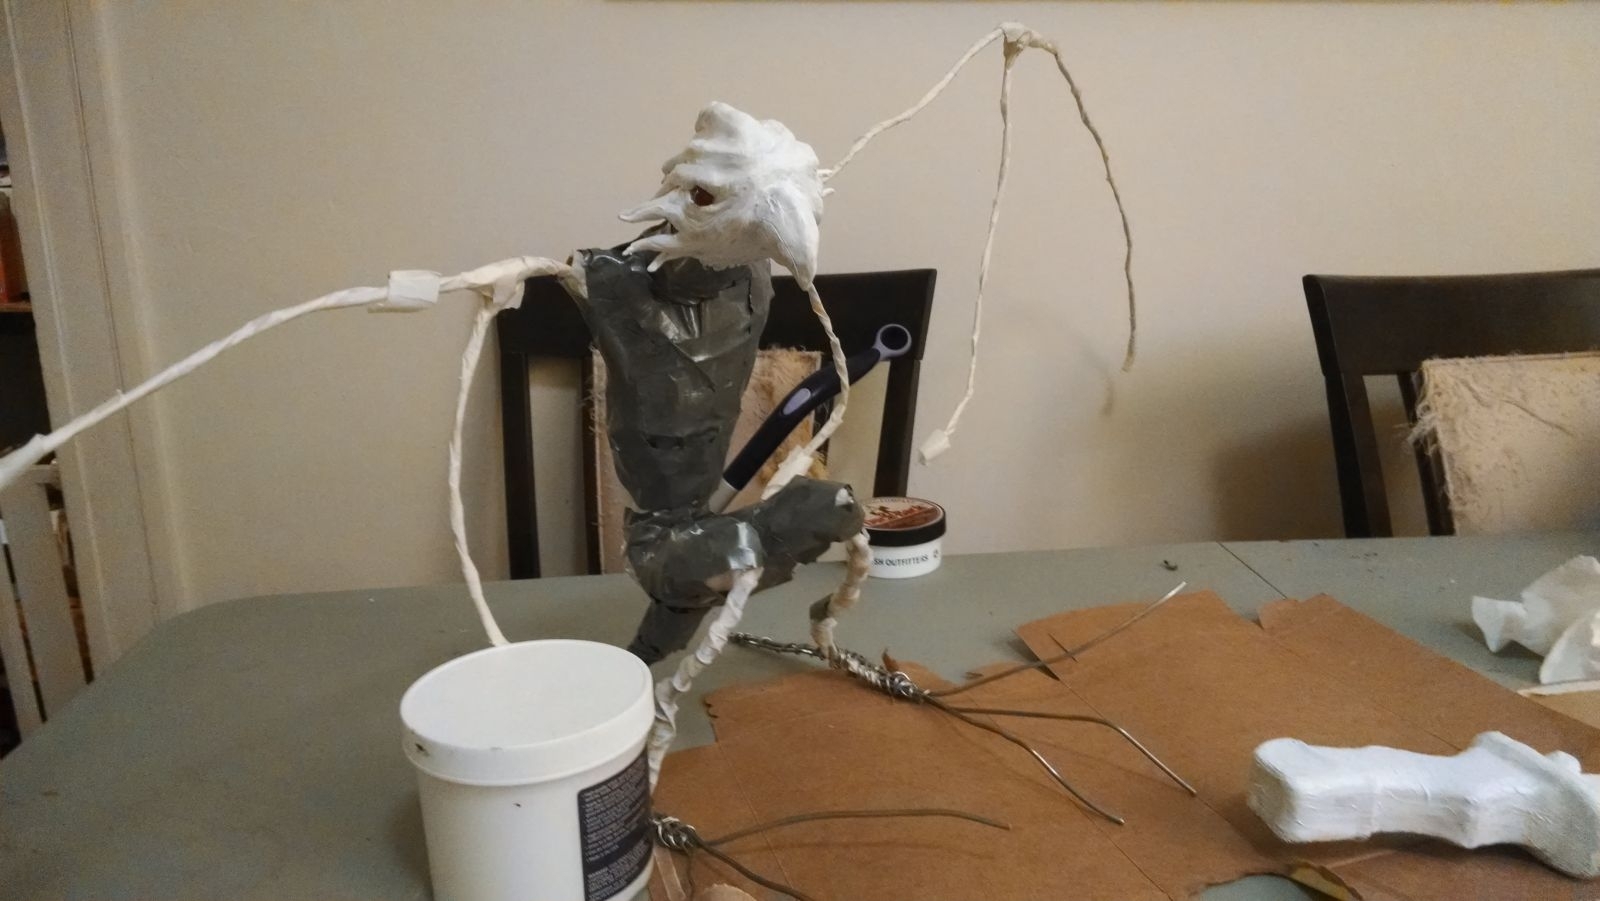 as all attached, I applied 2-3 coats of acylic gesso to it. I tried to apply them thinly because I hate sanding (just the feel of sanding paper creeps me out, I know, it's weird).
Then I stared laying in colors with acrylic paint. 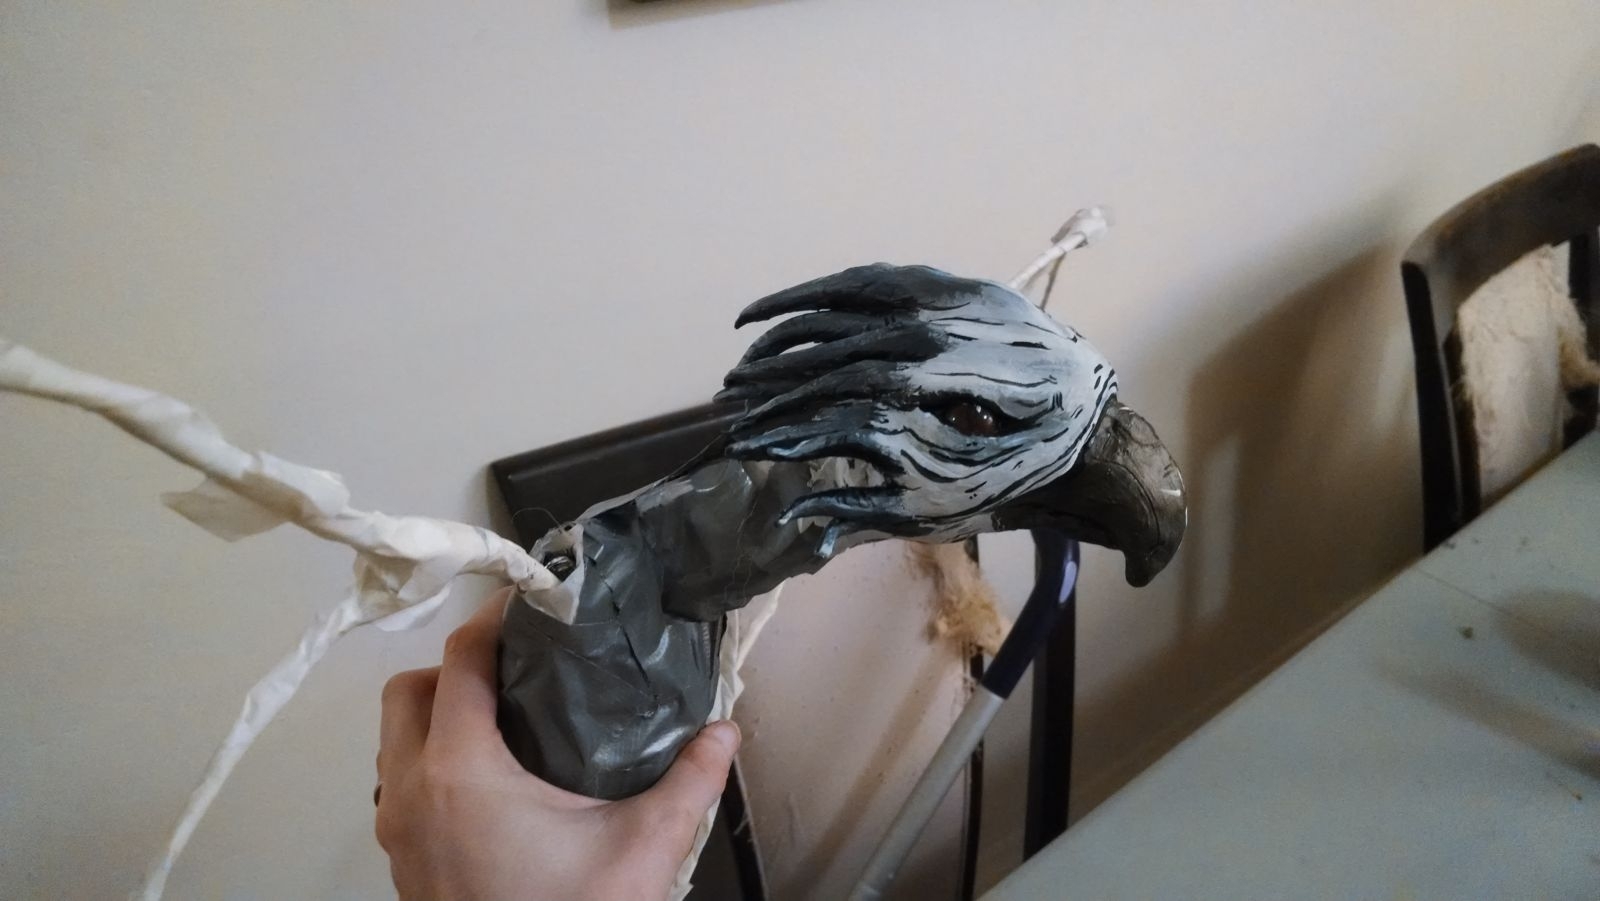 Usual painting rules apply - lighter colors first, then progressively darker colors on top (though acrylics are a little more forgiving about this than other paints). Unfortunately I didn't take a picture of the in between stages of paint because I'm on a bit of a deadline with this project. Once I was happy with all the colors, I added in the cel-shading with a very teeny tiny brush. Having good brushes is sort of key here - make sure you have a range of variously sized brushes for doing detail work.
Then I coated it in 2-3 coats of matte acrylic varnish because I didn't want her to be shiny (that'd be weird).
IV. Skin & "Feathers" part 1
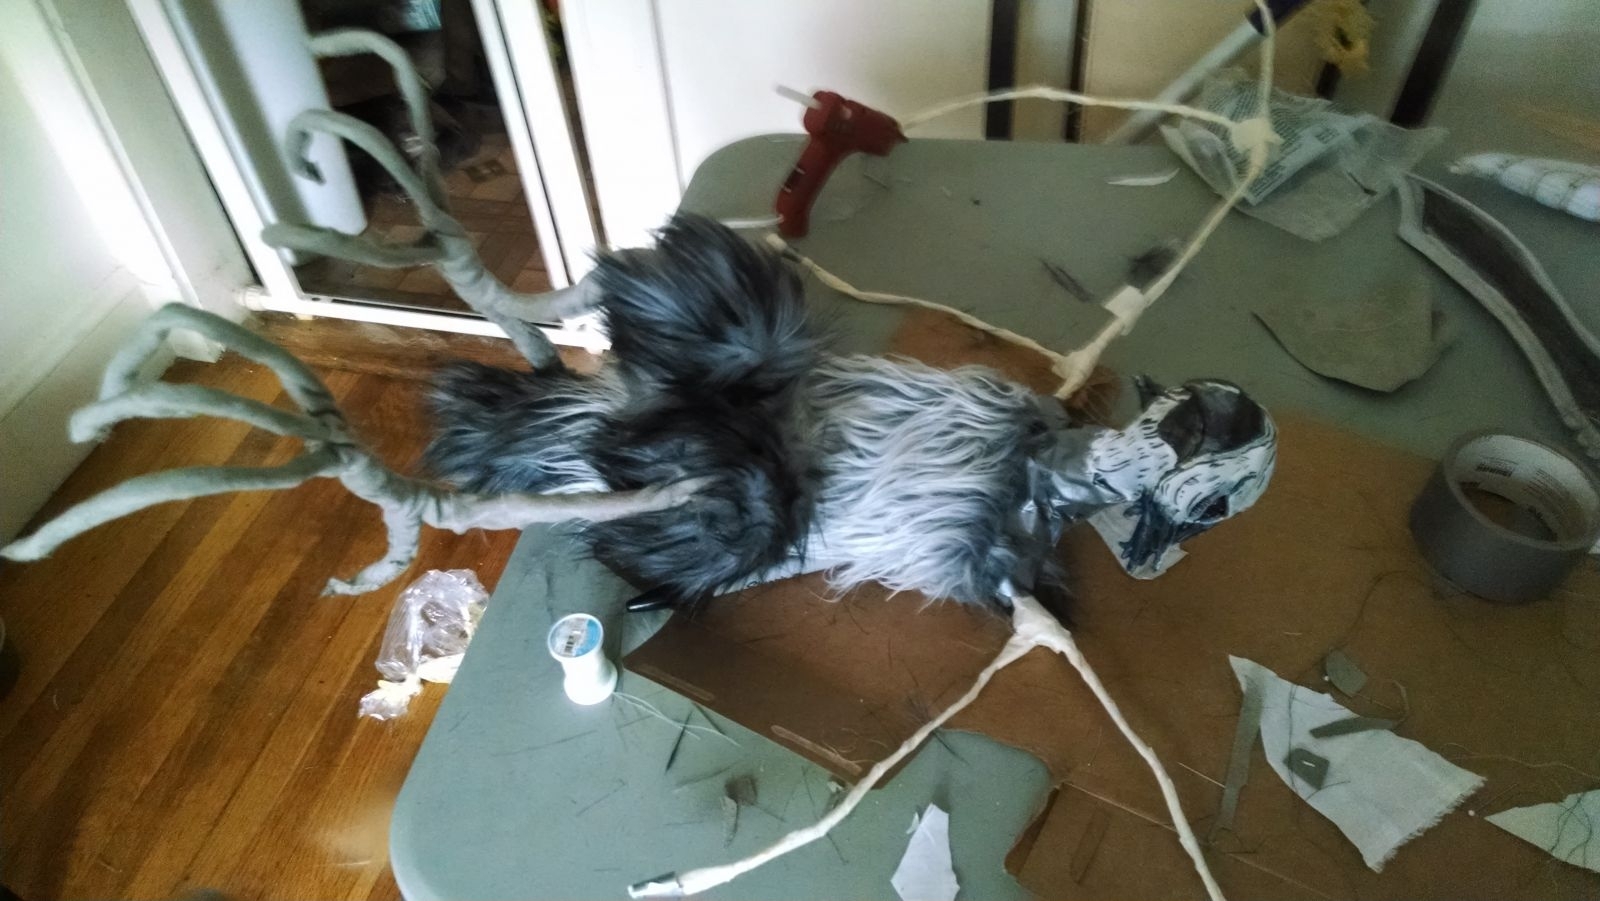 Sadly my method for this isn't exact- basically I draped a pattern for each area (skinned areas-feet/wings phalanges; feathered areas by color - grey or white) with muslin. Then I cut out my real fabric and hand stitched it to the frame.
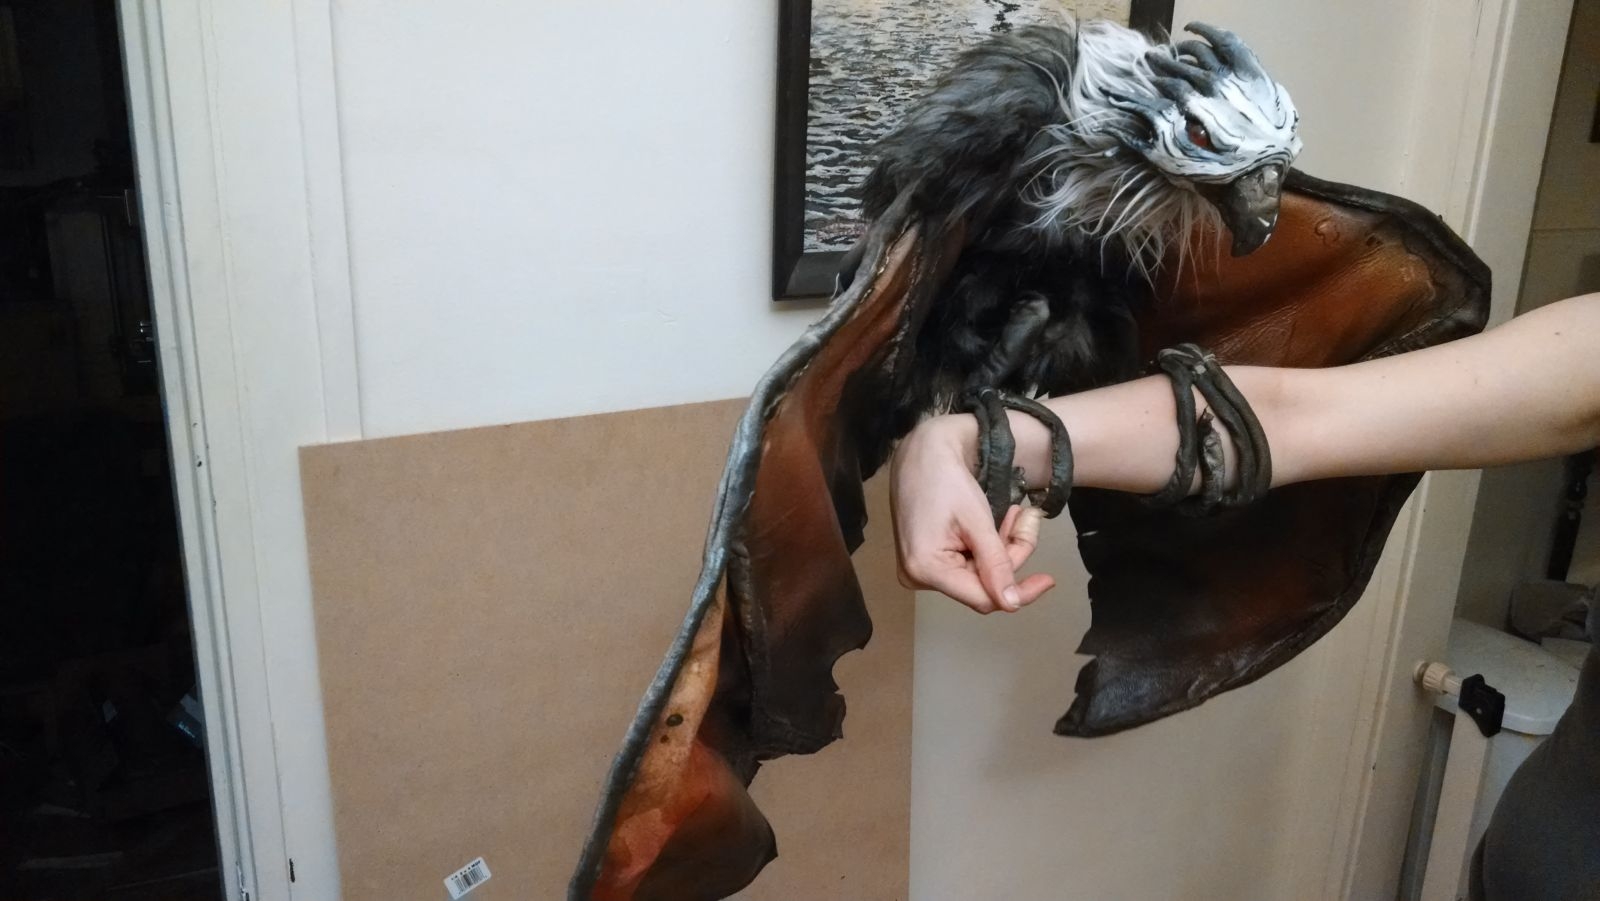
The feet were by far the most annoying and I didn't really think they were going to look that great, but the folds of the suede actually ended up looking fairly organic so I was mostly happy with it. I initally intended to add claws to the ends, but decided against it as they would have interfered with BW's ability to grip my arm (for a second one, I might do foam claws over wire).
I chose to go with a long pile faux fur for the feathers instead of real feathers mostly because I hate working with real feathers. Also the faux fur is long enough to simulate the fluffiness of Bloodwing's feathers. I used two different colors of faux fur, though both weren't a single color (which also worked with the cel-shaded nature of everything).
Once I had cut out each section, I carefully lay it down on the frame to make sure I was happy with how it was sitting. Then I applied hot glue to it in the main stress areas (*BE CAREFUL* with the hot glue if you use it. I managed to give myself 2nd degree burns when I accidentally touched a piece of fur with hot glue on it and it got stuck and was really awful) before hand sewing the fur into the frame (and to itself where it touches).
I created a fur laying diagram for myself-if you look at bloodwing, you'll notice that certain colors sit on top of each other, so I was careful to do the fur in this order. I only went up to the chest because I needed to add the wing skin in next as well as paint the wings, and I wanted to minimize the fur I'd have to repaint after.
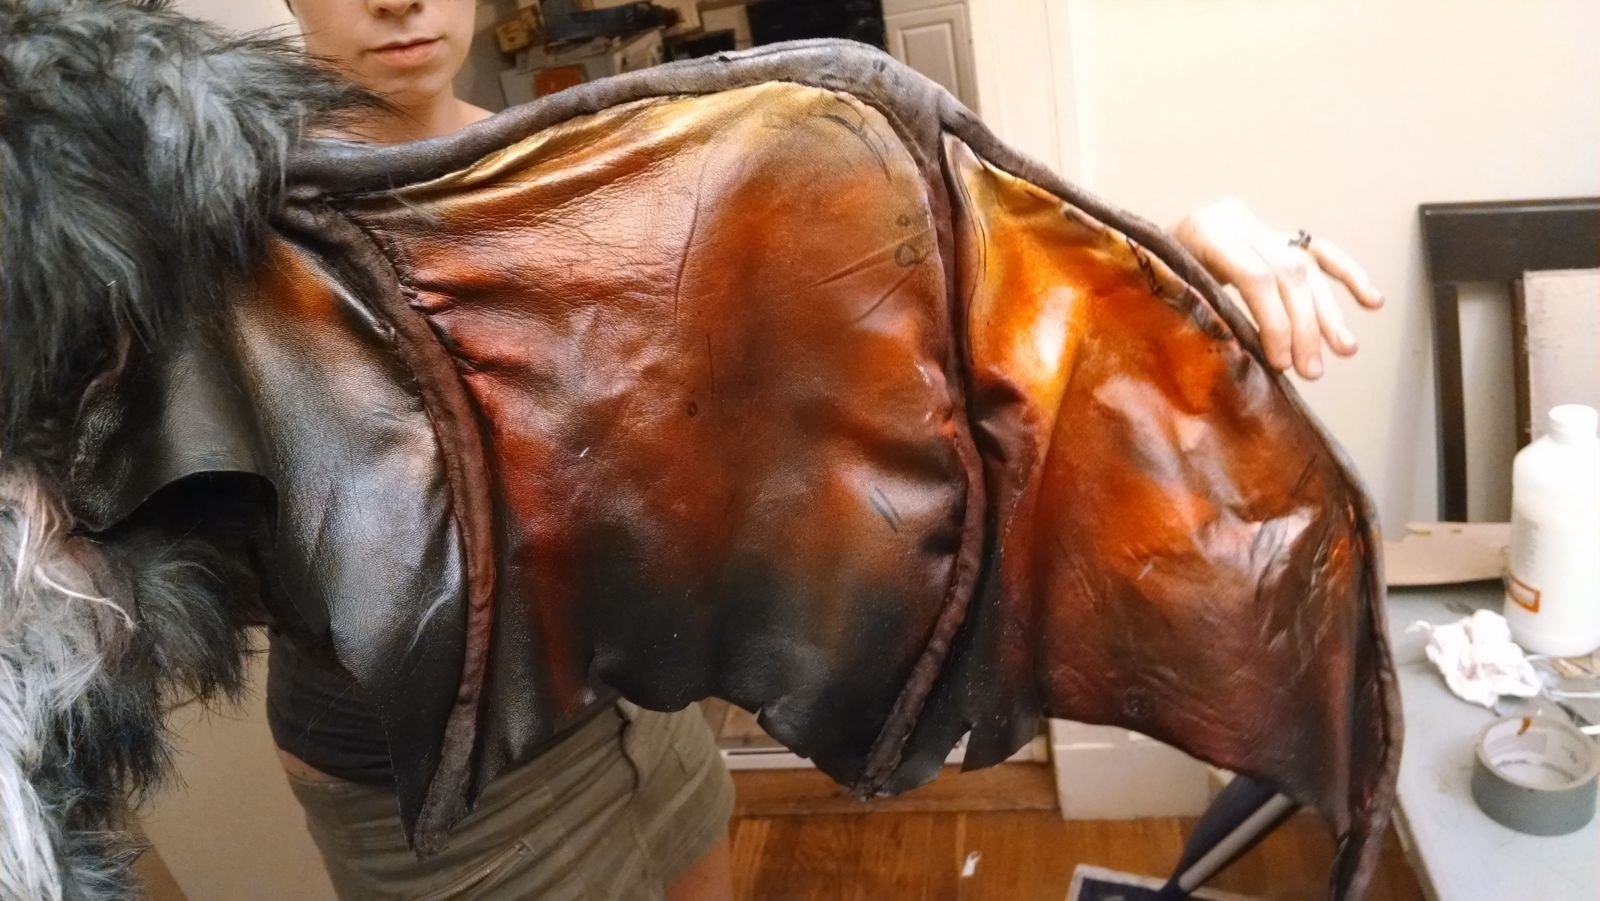
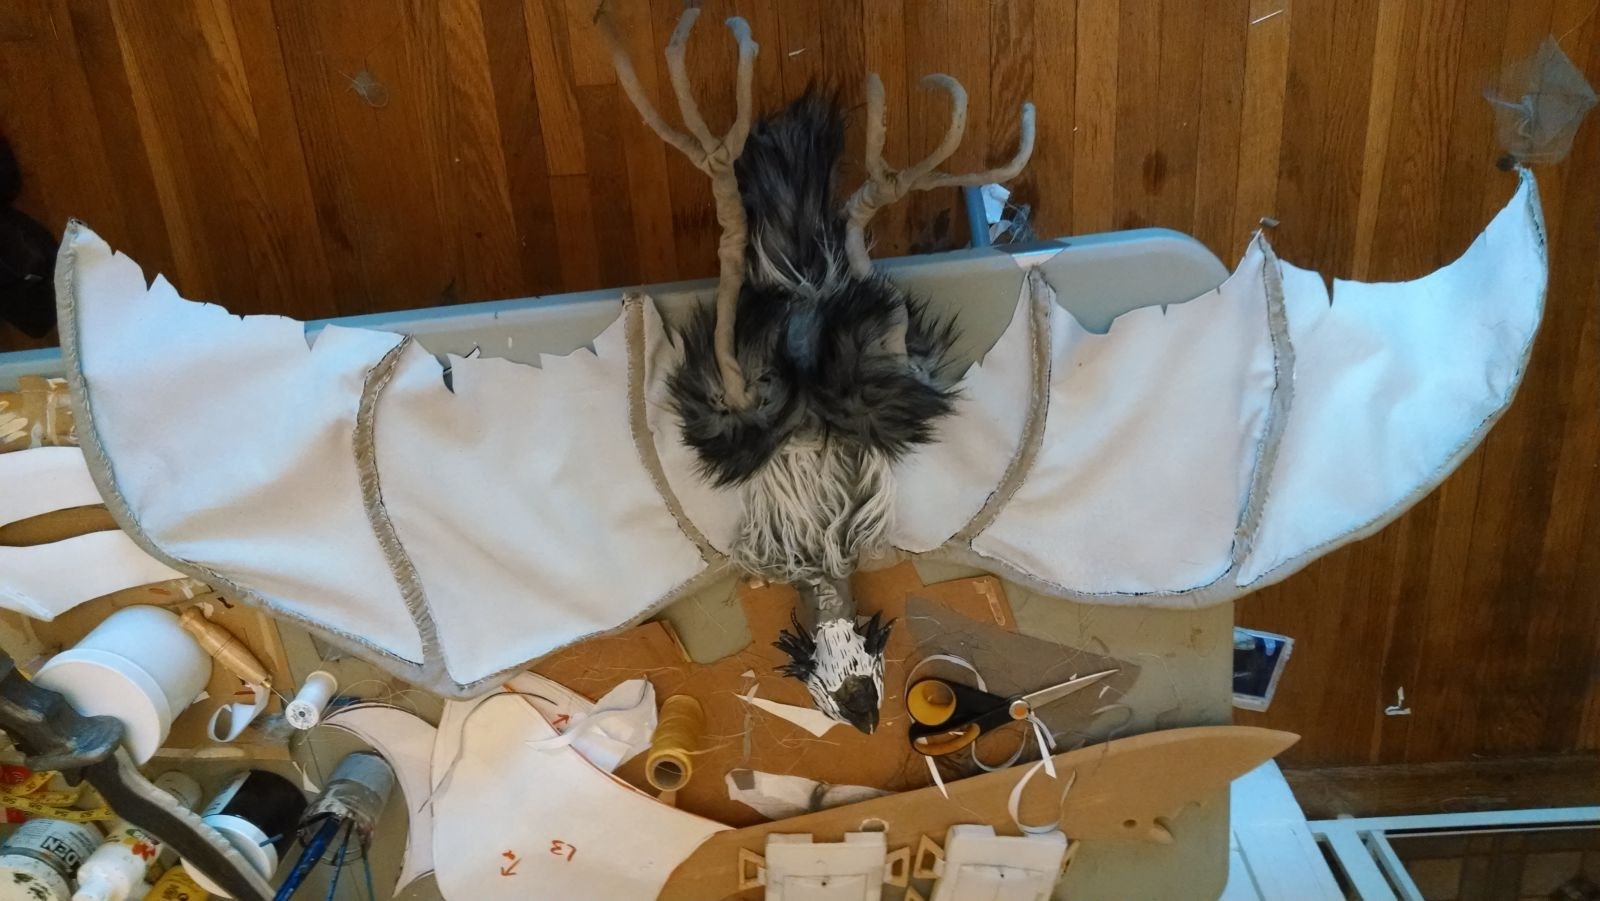 The wing membranes are a pretty lightweight lambskin. I patterned out each of the membranes and then cut them out carefully. I then painstakingly hand sewed each membrane into its wing finger (and the inside ones are sewn into bloodwing's sides). This alone took about 16+ hours of work (maybe more - hand sewing tends to make my back hurt, so I have to take more breaks then usual).
You also have to use the leather awl here to poke all the sewing holes in the leather before sewing them. This kind of leather is pretty thin so you could potentially get away with trying to force your needle through it as you go, but I've found in past projects that this method takes less time (you're also less likely to snap your needle). It also helps make your stitching a lot more even and neat.
When the wings were finally all stitched up, I cut out the weathering along the membranes.
V. Painting the Wings/Feet
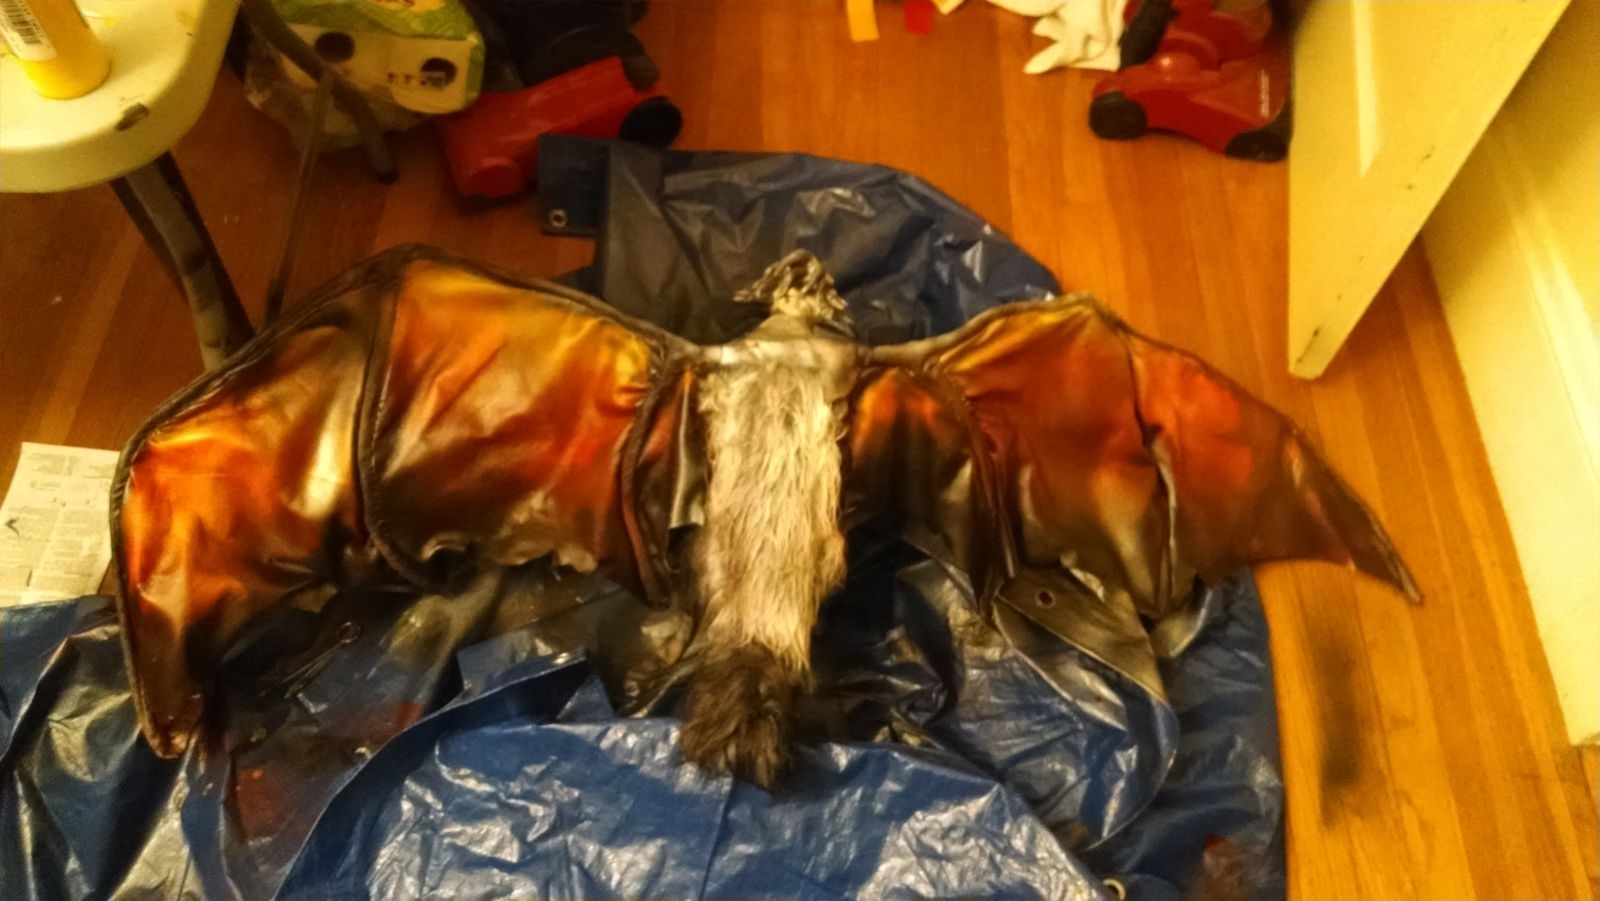 For painting the wings, I used an airbrush. Same as before - you want to go in with lighter colors first and then do darker colors. Bloodwing actually has some really nice colors in her wings (yellows and reds), so this was a lot of fun to do. I mixed in some pearlized colors to get a better texture/shine in some places as well. I mostly tried to build up colors slowly so they'd look more organic and natural (this is only the second time I've used the airbrush, so I think it came out pretty well)
I also darkened the feet and the areas around the knees. Once everything had dried, I used the heat gun on a low setting to heat set the colors (you don't want it to be too hot or too long - otherwise the paint will crack or react weirdly).
When it was dry and set, I took a very small brush and more acrylic paint to add in the fine details and cel-shading on the wings. It doesn't always show up in pictures, but I think it adds more of that borderlands feel to it (at this point I'm just a glutton for minute details that nobody will notice but me).
Once I was happy with that, I added 1-3 coats of satin varnish (it's slightly shinier than matte varnish, but it's still not very shiny) to the membranes on both sides and allowed it to dry.
VI. Final Fur & Finishing
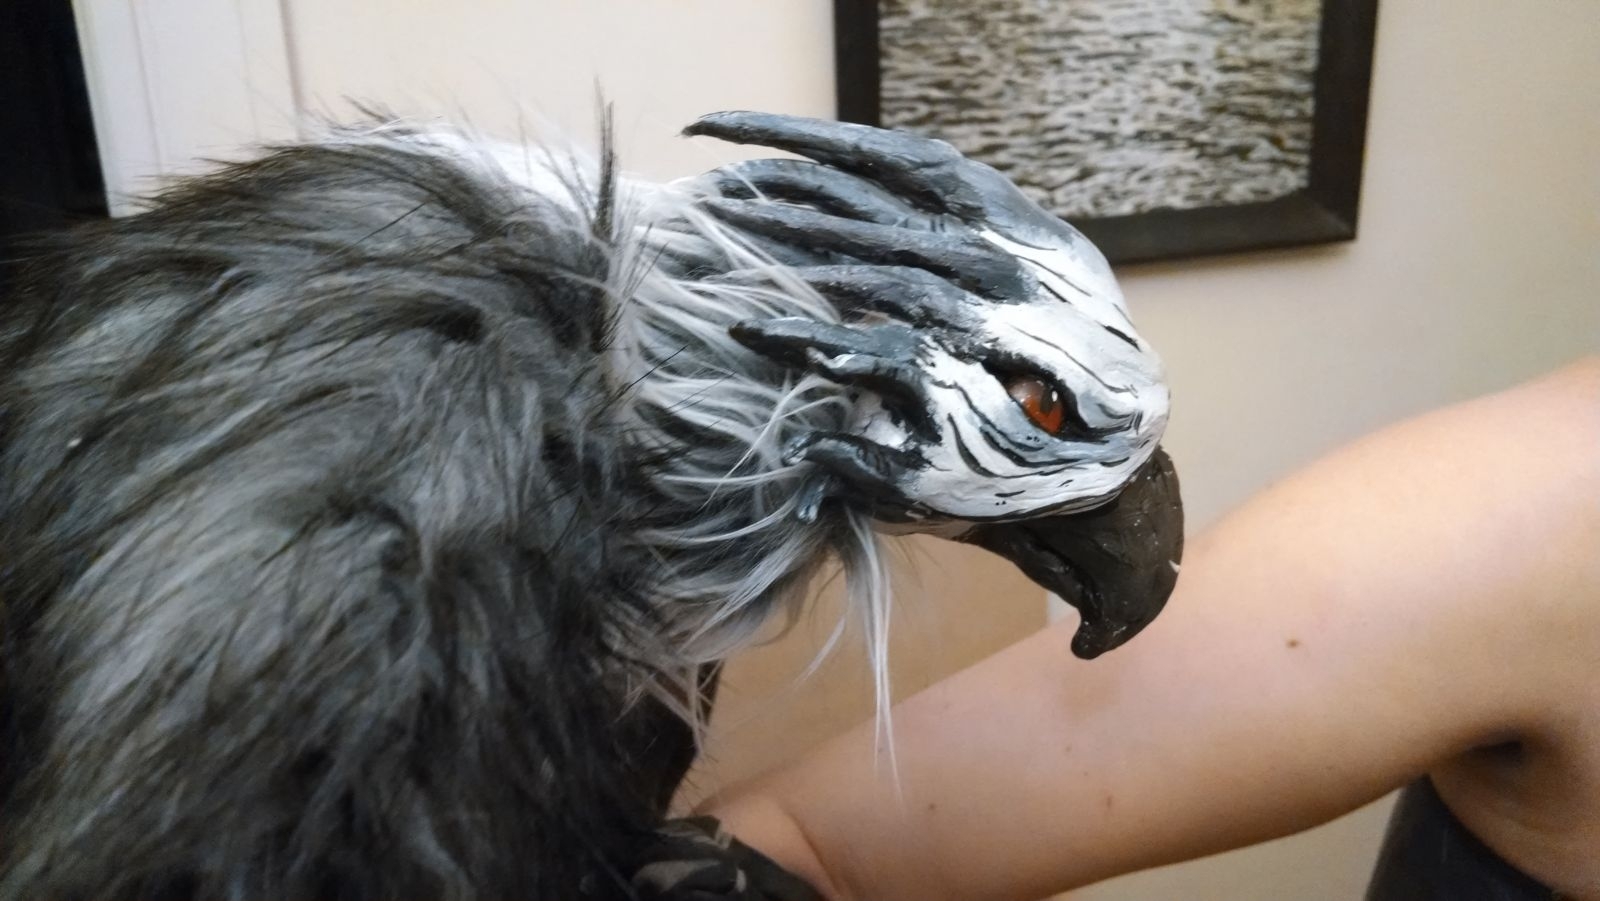 Once everything was dry, I added in the final neck/chest furs. The grey chest fur goes over the wings and had to be styled, sewn in to keep it secure. Then it was just the white fluffy neck furs and hiding the seam where the head attaches to the body. I also did a little styling on the other fur where it meets joints or skin - just to give it a little more fluff.
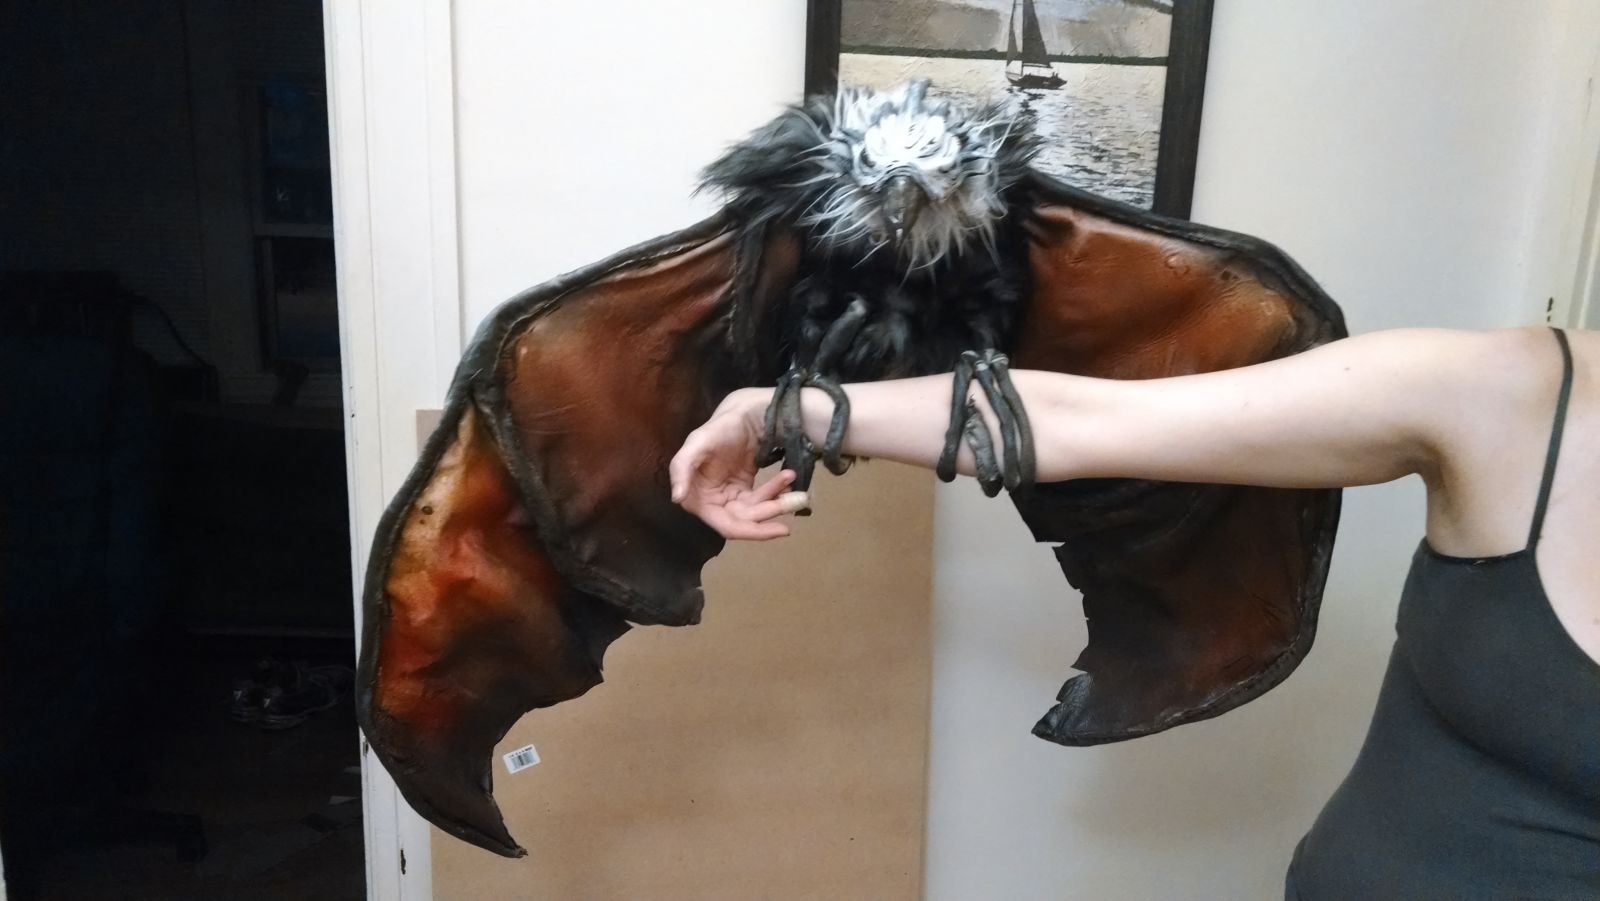
I also tested to make sure that Bloodwing could still perch on my arm without aid (she can) and the wings could still bend as much as I wanted them too (they actual bend a little more than I want them too). And that's just about it!
Hopefully this was helpful to you in seeing my process. The whole project took about a month to complete and I learned a lot. If you have any further questions, feel free to email me or leave a comment on our facebook page.